


由于时间原因,今天实现了一个简单的功能 —— list 功能。
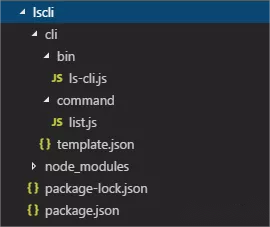
当前文件结构
- cli-table2:内容以表格形式呈现。
- chalk:色彩丰富的终端工具,可以给终端的字体加上颜色。
1、安装依赖cli-table2,chalk上一期已经安装过了
npm install cli-table2
2、编写模板文件template.json
我在根目录下建立 \cli 文件夹,在里面建立一个 template.json 文件。这个 cli\template.json 文件是模板列表文件。
{
  "Moban1": {
    "url": "替换成模板下载地址",
    "description": "Moban1-描述"
  },
  "Moban2": {
    "url": "替换成模板下载地址",
    "description": "Moban2-描述"
  }
}
3、修改入口文件里的list指令部分,需要传入模板数据。
#!/usr/bin/env node
const templateName = require('../template')

program
  .command('list')
  .description('展示模板列表')
  .alias('l')
  .action(() => {
    require('../command/list')(templateName)
  })
4、编写list功能文件
我在根目录下建立 \cli\command 文件夹,在里面建立一个 list.js 文件。这个 cli\command\list.js 文件是list功能文件。
注:
1. cli-table2中文网地址:https://www.javascriptcn.com/read-40921.html
2. chalk使用方法:https://www.npmjs.com/package/chalk
'use strict'
const Table = require('cli-table2');
const chalk = require('chalk');

module.exports = (templateName) => {
  var table = new Table({
      head: ['templateName', 'description']
  });
  // table是一个Array, 所以可以使用 `push`, `unshift`, `splice`等数组方法
  const keys = Object.keys(templateName); // 返回key字符串数组
  if(keys.length) {
    keys.forEach((key) => {
      table.push(
        // 我这里用的是 Horizontal Tables形式
        [`${key}`, templateName[key].description]
      )
    })
    const list = table.toString(); // 转化为表格过程
    if (list) {
      console.log(chalk.green(`\n ok   模板列表是: \n`))
      console.log(`${list}\n`)
    } else {
      console.log(chalk.red(`\n !   模板不存在!\n`))
    }
  } else {
    console.log(chalk.red(`\n !   模板不存在!\n`))
  }

  process.exit();
}
运行结果

今天就到这里了,下一篇文章继续更新命令内部逻辑的编写。
本文仅是学习中的记录,有错误请指正。
© 版权声明
文章版权归作者所有,未经允许请勿转载。
THE END


![[3880] 1947 波士顿 / Road to Boston (2023)-www.131417.net](https://i.postimg.cc/px0Nd3nS/3880-1947bo-shi-dun.webp)
![[3898] 赤壁(下) / Red Cliff: Part II (2009)-www.131417.net](https://i.postimg.cc/w6FQGfxX/3898.webp)
![[3903] 盗梦特攻队 / Ruben Brandt, a gyüjtö (2018)-www.131417.net](https://i.postimg.cc/SQjFSNgM/3903-dao-meng-te-gong-dui-2018.webp)
![[3905] 第一滴血 5:最后的血 / Rambo: Last Blood (2019)-www.131417.net](https://i.postimg.cc/BJxD3Rm4/3905-di-yi-di-xue5-zui-hou-de-xue-2019.webp)
![[3893] 不日成婚 / Ready O/R Knot (2021)-www.131417.net](https://i.postimg.cc/hDhWZ9jF/3893-bu-ri-cheng-hun-2021.webp)
暂无评论内容