


今天研究Create功能
- fs-extra:fs-extra是fs的一个扩展,提供了非常多的便利API
- path:Node.js path 模块提供了一些用于处理文件路径的小工具
- chalk:chalk,可以给终端的字体加上颜色
- inquirer:inquirer.js给用户提供了一个漂亮的界面和提出问题流的方式。
- 细则地址:https://www.javascriptcn.com/read-47603.html
- type详细解析:https://blog.csdn.net/qq_26733915/article/details/80461257
- download-git-repo:下载并提取 git 仓库,用于下载项目模板。
- 文档地址:https://www.javascriptcn.com/read-56681.html
- validate-npm-package-name:给定字符串是否是有效的npm包名称。这个软件包导出一个带有 string 作为输入并返回具有两个属性的对象的单个同步函数。
- 解析地址:https://www.helplib.com/GitHub/article_120141
- ora:下载过程久的话,可以用于显示下载中的动画效果。
- 解析地址:https://www.npmjs.com/package/ora
1、安装依赖[学习笔记──搭建脚手架(一)中都安装过了,没安装的自行安装]
2、修改入口文件里的list指令部分,需要传入模板数据。
program
  .command('create <projectName>')
  .description('create a new project')
  .option('-c, --create', '覆盖目标目录创建')
  .action((name, cmd) => {
    const options = cleanArgs(cmd)
    require('../command/create')(name, options)
  })

// commander passes the Command object itself as options,
// extract only actual options into a fresh object.
function cleanArgs (cmd) {
  const args = {}
  cmd.options.forEach(o => {
    const key = o.long.replace(/^--/, '')
    // if an option is not present and Command has a method with the same name
    // it should not be copied
    if (typeof cmd[key] !== 'function' && typeof cmd[key] !== 'undefined') {
      args[key] = cmd[key]
    }
  })
  return args
}
3、编写create功能文件
我在根目录下建立 \cli\command 文件夹,在里面建立一个 create.js 文件。这个 cli\command\create.js 文件是create功能文件。
const fs = require('fs-extra') // fs-extra是fs的一个扩展,提供了非常多的便利API
const path = require('path') // Node.js path 模块提供了一些用于处理文件路径的小工具
const chalk = require('chalk') // chalk,可以给终端的字体加上颜色
const inquirer = require('inquirer') // inquirer.js 给用户提供了一个漂亮的界面和提出问题流的方式。细则地址:https://www.javascriptcn.com/read-47603.html
const download = require('download-git-repo') // 下载并提取 git 仓库,用于下载项目模板。
const {error, stopSpinner, logWithSpinner, log} = require('../../publicUtils')
const validateProjectName = require('validate-npm-package-name') // 给定字符串是否是有效的npm包名称。这个软件包导出一个带有 string 作为输入并返回具有两个属性的对象的单个同步函数,解析:https://www.helplib.com/GitHub/article_120141
const templateName = require('../template')

async function create(projectName, options) {
  const inCurrent = projectName === '.' // '.'为在当前文件夹创建项目 inCurrent=true/false
  const name = inCurrent ? path.relative('../', process.cwd()) : projectName // 创建的项目名字
  // 知识点1、path.relative(from, to)用于将绝对路径转为相对路径,返回从 from 到 to 的相对路径。
  // 知识点2、process.cwd()返回 当前Node.js进程执行时的工作目录
  const targetDir = path.resolve(projectName || '.') // targetDir为创建项目的文件夹路径,如果创建时是. 那此路径是已存在的,如果创建的是新名字,那路径是不存在的。
  // path.resolve([from ...], to) 将 to 参数解析为绝对路径,给定的路径的序列是从右往左被处理的,后面每个 path 被依次解析,直到构造完成一个绝对路径。
  // 例:path.resolve('wwwroot', 'static_files/png/', '../gif/image.gif'); // 如果当前工作目录为 /home/myself/node,// 则返回 '/home/myself/node/wwwroot/static_files/gif/image.gif'
  const result = validateProjectName(name) // 判断名字是否有效,返回validForNewPackages:true/false false时会返回errors信息
  // 名字无效 打印errors信息并退出
  if (!result.validForNewPackages) {
    console.error(chalk.red(`Invalid project name无效的项目名称: "${projectName}"`))
    result.errors && result.errors.forEach(err => {
      console.error(chalk.red(err))
    })
    process.exit(1)
  }
  // fs.existsSync(path):如果路径存在,则返回 true,否则返回 false。
  if (fs.existsSync(targetDir)) {
    // 验证create命令中的option,.option('-c, --create', '覆盖目标目录创建')
    if (options.create) {
      await fs.remove(targetDir) // 移除当前同名文件目录
    } else {
      // 在'.'当前文件夹内创建项目
      if (inCurrent) {
        const {ok} = await inquirer.prompt([
          {
            name: 'ok',
            type: 'confirm', // Prompt types —— 问题类型:提问,回答为Y/N。若有default属性,则属性值应为Boolean类型
            message: `Generate project in current directory?在当前目录中生成项目?`
          }
        ])
        if (!ok) {
          return
        }
      } else {
        // 非'.'当前文件夹内创建项目
        const {action} = await inquirer.prompt([
          {
            name: 'action',
            type: 'list',
            message: `Target directory ${chalk.cyan(targetDir)} already exists. Pick an action:`,
            choices: [
              {name: 'Overwrite覆盖', value: 'overwrite'},
              {name: 'Cancel取消', value: false}
            ]
          }
        ])

        if (!action) {
          return
        } else if (action === 'overwrite') { // 覆盖——移除当前同名文件目录
          console.log(`\nRemoving ${chalk.cyan(targetDir)}...`)
          await fs.remove(targetDir)
        }
      }
    }
  }

  const {project} = await inquirer.prompt([
    {
      name: 'project',
      // type详细解析 https://blog.csdn.net/qq_26733915/article/details/80461257
      type: 'rawlist',// 与List类型类似,不同在于,list打印出来为无序列表,而rawlist打印为有序列表
      message: `which project do you want to install?请选择要使用的模板`,
      choices: [
        {name: 'Moban1'},
        {name: 'Moban2'},
      ]
    }
  ])
  if (!project) {
    return
  }
  logWithSpinner(` `, `Creating project in ${chalk.yellow(targetDir)}.`)
  // download(repository仓库地址, destination目的地, options, callback) 文档地址:https://www.javascriptcn.com/read-56681.html
  download(templateName[project].url, targetDir, {clone: true}, function (err) {
    if (!err) {
      stopSpinner()
      log(`Successfully created project ${chalk.yellow(project)}.`)
    } else {
      console.log(err)
    }

  })
}

module.exports = (...args) => {
  create(...args).catch(err => {
    stopSpinner(false) // do not persist
    error(err)
    process.exit(1)
  })
}

// type详细解析 https://blog.csdn.net/qq_26733915/article/details/80461257
// Prompt types —— 问题类型
// 【1】List
// {type: 'list'}
// 问题对象中必须有type,name,message,choices等属性,同时,default选项必须为默认值在choices数组中的位置索引(Boolean)
// 【2】Raw list
// {type: 'rawlist'}
// 与List类型类似,不同在于,list打印出来为无序列表,而rawlist打印为有序列表
// 【3】Expand
// {type: 'expand'}
// 同样是生成列表,但是在choices属性中需要增加一个属性:key,这个属性用于快速选择问题的答案。类似于alias或者shorthand的东西。同时这个属性值必须为一个小写字母
// 【4】Checkbox
// {type: 'checkbox'}
// 其余诸项与list类似,主要区别在于,是以一个checkbox的形式进行选择。同时在choices数组中,带有checked: true属性的选项为默认值。
// 【5】Confirm
// {type: 'confirm'}
// 提问,回答为Y/N。若有default属性,则属性值应为Boolean类型
// 【6】Input
// {type: 'input'}
// 获取用户输入字符串
// 【7】Password
// {type: 'password'}
// 与input类型类似,只是用户输入在命令行中呈现为XXXX
// 【8】Editor
// {type: 'editor'}
// 终端打开用户默认编辑器,如vim,notepad。并将用户输入的文本传回
4、在cli文件下同级下创建文件夹cli-publicUtils
创建spinner.js
const ora = require('ora') // 下载过程久的话,可以用于显示下载中的动画效果。解析地址:https://www.npmjs.com/package/ora
const chalk = require('chalk') // chalk,可以给终端的字体加上颜色

const spinner = ora()
let lastMsg = null

exports.logWithSpinner = (symbol, msg) => {
  if (!msg) {
    msg = symbol
    symbol = chalk.green('ok')
  }
  if (lastMsg) {
    spinner.stopAndPersist({
      symbol: lastMsg.symbol,
      text: lastMsg.text
    })
  }
  spinner.text = ' ' + msg
  lastMsg = {
    symbol: symbol + ' ',
    text: msg
  }
  spinner.start()
}

exports.stopSpinner = (persist) => {
  if (lastMsg && persist !== false) {
    spinner.stopAndPersist({
      symbol: lastMsg.symbol,
      text: lastMsg.text
    })
  } else {
    spinner.stop()
  }
  lastMsg = null
}
创建logger.js
const chalk = require('chalk')
const readline = require('readline')
const padStart = require('string.prototype.padstart')
const EventEmitter = require('events')

exports.events = new EventEmitter()

function _log (type, tag, message) {
  exports.events.emit('log', {
    message,
    type,
    tag
  })
}

const format = (label, msg) => {
  return msg.split('\n').map((line, i) => {
    return i === 0
      ? `${label} ${line}`
      : padStart(line, chalk.reset(label).length)
  }).join('\n')
}

const chalkTag = msg => chalk.bgBlackBright.white.dim(` ${msg} `)

exports.log = (msg = '', tag = null) => {
  tag ? console.log(format(chalkTag(tag), msg)) : console.log(msg)
  _log('log', tag, msg)
}

exports.info = (msg, tag = null) => {
  console.log(format(chalk.bgBlue.black(' INFO ') + (tag ? chalkTag(tag) : ''), msg))
  _log('info', tag, msg)
}

exports.done = (msg, tag = null) => {
  console.log(format(chalk.bgGreen.black(' DONE ') + (tag ? chalkTag(tag) : ''), msg))
  _log('done', tag, msg)
}

exports.warn = (msg, tag = null) => {
  console.warn(format(chalk.bgYellow.black(' WARN ') + (tag ? chalkTag(tag) : ''), chalk.yellow(msg)))
  _log('warn', tag, msg)
}

exports.error = (msg, tag = null) => {
  console.error(format(chalk.bgRed(' ERROR ') + (tag ? chalkTag(tag) : ''), chalk.red(msg)))
  _log('error', tag, msg)
  if (msg instanceof Error) {
    console.error(msg.stack)
    _log('error', tag, msg.stack)
  }
}

exports.clearConsole = title => {
  if (process.stdout.isTTY) {
    const blank = '\n'.repeat(process.stdout.rows)
    console.log(blank)
    readline.cursorTo(process.stdout, 0, 0)
    readline.clearScreenDown(process.stdout)
    if (title) {
      console.log(title)
    }
  }
}
运行结果
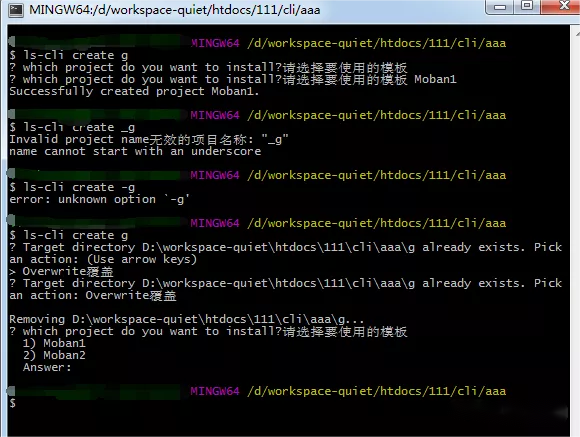
运行结果今天就到这里了,下一篇文章继续更新命令内部逻辑的编写。
本文仅是学习中的记录,有错误请指正。
© 版权声明
文章版权归作者所有,未经允许请勿转载。
THE END


暂无评论内容